Jewellery Management Desktop Core Java Technology
Core administration platform for jewellery management Key Features:
How to Start
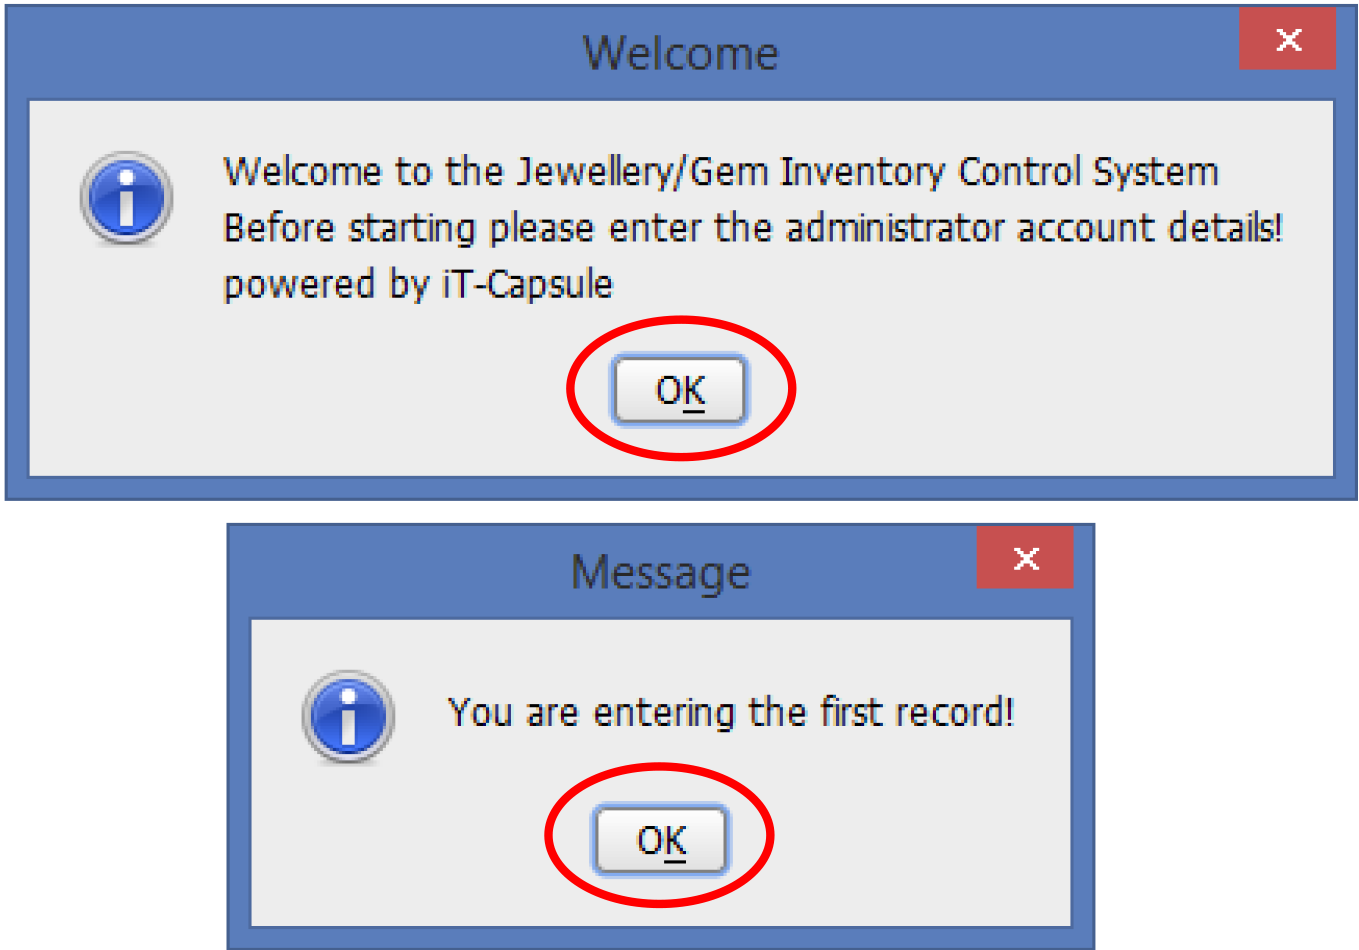
Press OK Button to go in to the system.
Then you can see the Employee Registry form.
Fill it and close all the forms related an inventory control system & re-open
it.
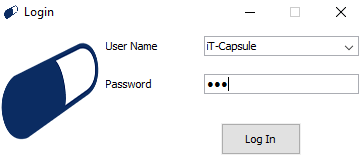
Login
Select username, enter the password to the System,
Press
Enter
in the Key Board or Press Log in Button.
If you get an Error like "Incorrect UserName or Password"
Change the Password with Administrator Login Trough the Employee Registry.
Employee Registry
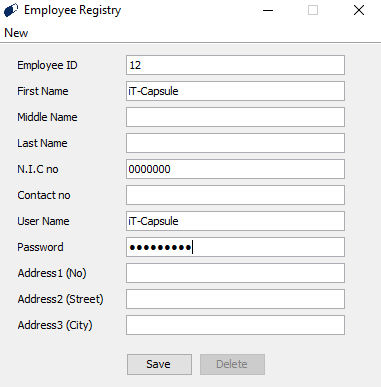
Employee ID is automatically generating. Now you can enter the Employee details in
every
field as requested.
Administrator must enter the first employee registry to make all the amendments in
the
software.
Every employee registry must enter the Username field and the password field.
Only Administrator can Delete or update an existing record.
If you get any error, check the username, password fields that you entered.
You can’t change the username. If you want to change it, you have to enter as a new
employer
& different username.
Customer/Supplier/Contractor details cannot be deleted.
TO ENTER A NEW RECORD OF EMPLOYEE - File -> New Employee
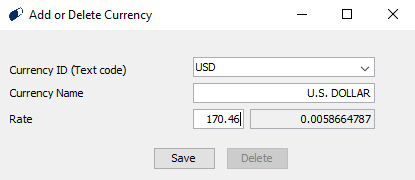
Currency
You can add, update or delete the currencies. (with an Administrator login)
If you want to save the amendments, click on the rate field and press
Enter.
Then you can enable the save button.
Credit Cards

Press the BackSpace button on your keyboard to see the
existing
credit cards.
Simply click on the table data to change the name or rate.
You can add, update or delete the credit cards. (with an Administrator login)
Item Class(Item Category)
Press the BackSpace button on your keyboard to see the
existing
Item Class.
Simply click on the table data to change the name or ID.
You can add, update or delete the ITEM CLASSES. (with an Administrator login)

Stores
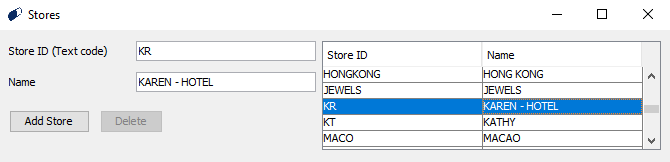
Press the BackSpace button on your keyboard to see the
existing
Stores.
Simply click on the table data to change the name or ID.
You can add, update or delete the Stores. (with an Administrator login)
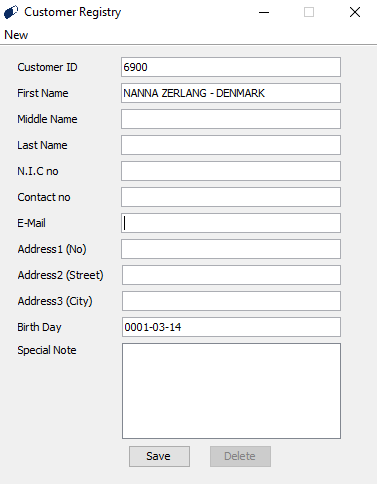
Adding Customer | Supplier | Contractor
Customer/Supplier/Contractor ID is automatically generating. Now you can enter the Customer/Supplier/Contractor details in every field as requested. Only Administrator can Delete or update an existing record. You can update the existing Record with inserts into Customer/Supplier/Contractor ID field with the valid Customer/Supplier/Contractor ID.
Customer/Supplier/Contractor Details is a must to do the transactions in Invoices,Good Receive Notes, Transfer Notes, Sales Returns,GRN Returns, Job Orders & etc… Customer/Supplier/Contractor details cannot be deleted.
ADDING CUSTOMERS – File -> New Customer Registry
ADDING SUPPLIERS – File -> New Supplier Registry
ADDING CONTRACTORS – File -> New Contractor Registry
Items
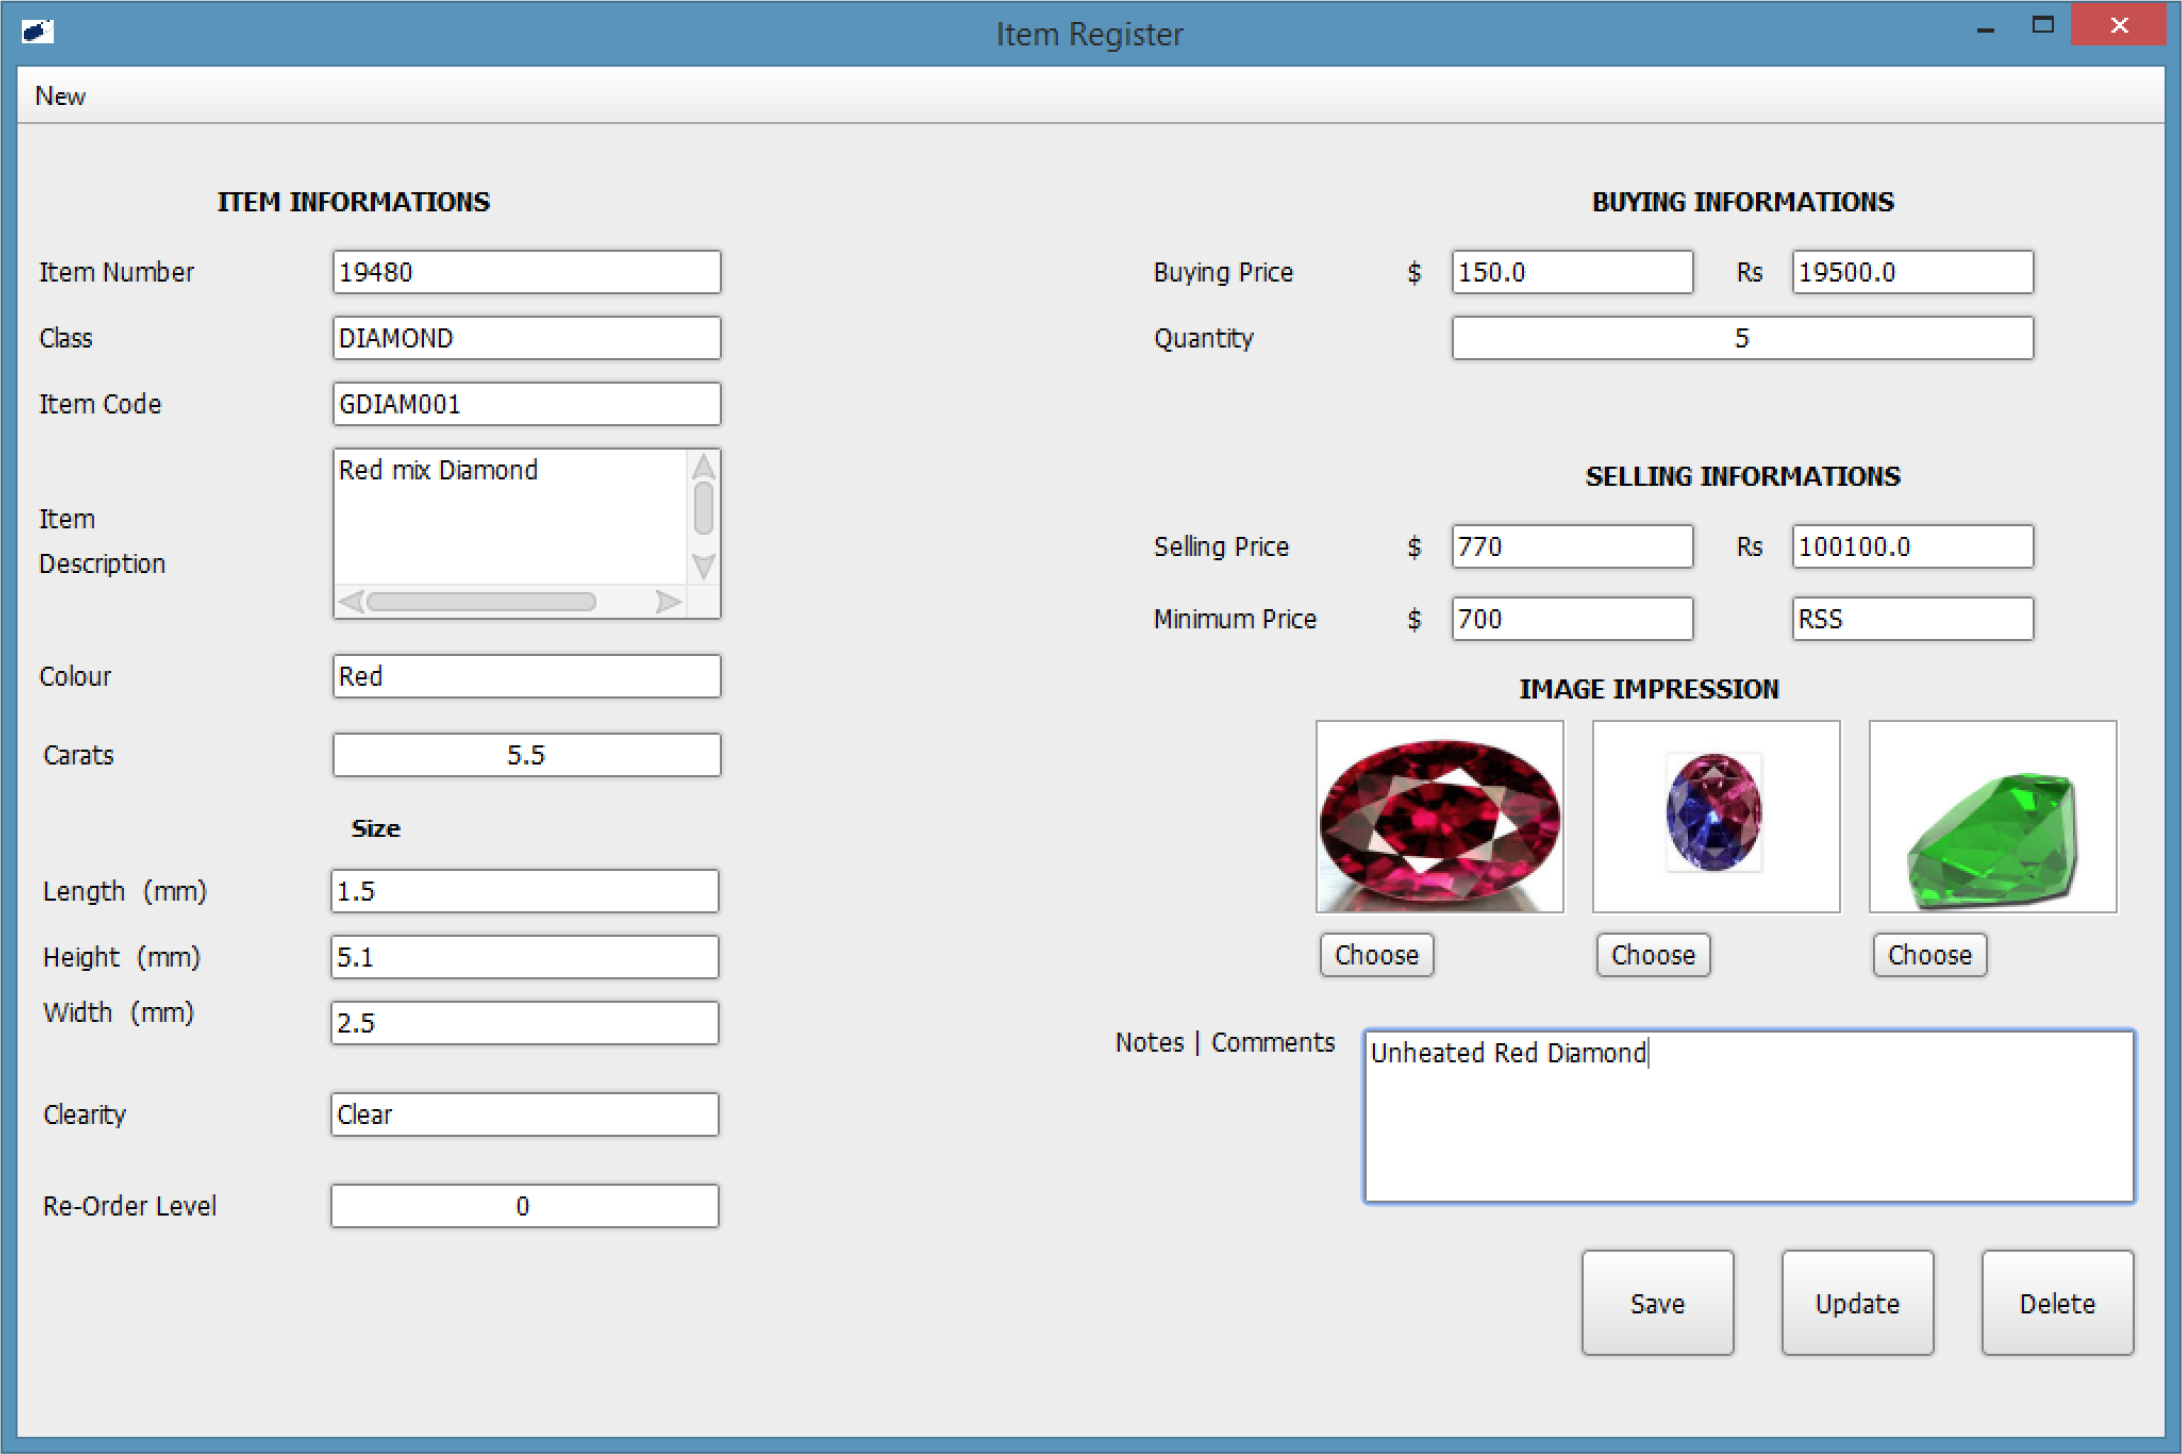
Item Number is automatically generating. Don’t change the Item number in the Item
Number
Field.
If it change, go to New->New Item Form or Press Ctrl+N to Dispose the Current Data and Show new Item
Form.
Enter Your Item Class in your Field. If it’s not coming, see
ITEM
CLASSES.
You Must Update the USD ($) Value under the CURRENCIES.
Note- If not updated the USD values, the calculations will
be
incorrect.
Enter Simple Code to Item Description Field. The Item Description is only to
recognize Items
within the System.
You can enter the Valid Details within the Fields and Store three dimensional photos
of the
Gem or the Item.
Only Administrator can do the Updating and Deleting.
If you need to see the existing quantities, just enter the Item Number or Item Code
in the
Item Number Field and Press Enter Button. Then you can
see the
Details of it.
Notes | Comments will be appearing when printing.(In the Invoice, GRN, Returns)
You can search the Items by Carets.
You should not alter (renaming or replacing folders) a given image to the software.
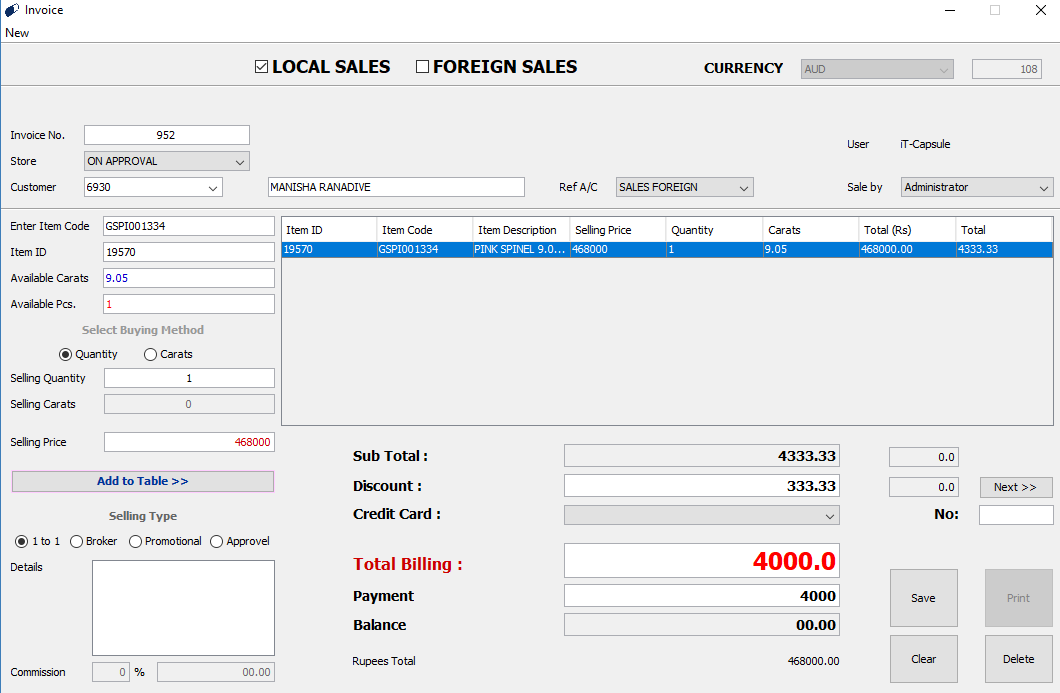
Invoicing [Local | Foreign]
Choose the currency type as Foreign or Local.
Must select the fields Store, Customer, Ref A/C, and Sale by and enter data.
Available Pcs. and Available Carets will appear once you enter the Item Code or Item
ID.
Cannot exceed the Available Pcs. And Available Carets when invoicing.
When invoicing according to Carets, must enter the price of a Carat.(Software will
multiply
the price according to the Carat amount)
Selling Type can be selected as convenient and the commission will be included in
the Sub
Total.
Data can be deleted from the table when you press the Delete button after selecting
the
row.
Save button will be visible after entering data to Payment field.
Purchase[Good Receive Note]
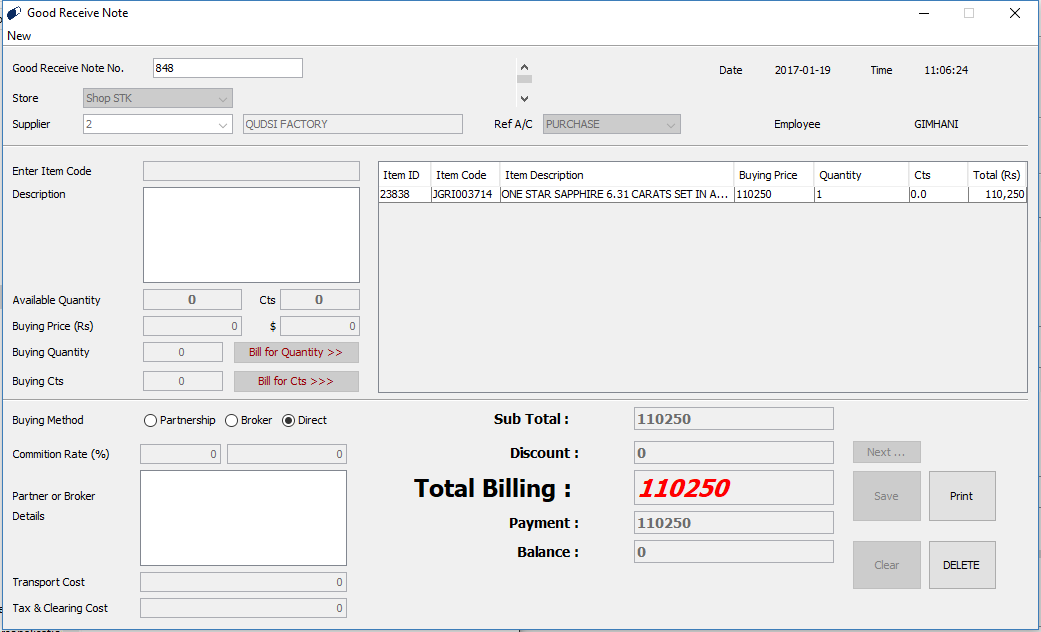
Good Receive Note is used when newly purchasing quantities are added to the stock.
For new suppliers, Supplier must be added into the Supplier registry before
continuing in
the Good Receive Note.
(See Supplier Registry).
Must select the fields Store, Supplier and Ref A/C and enter data.
Available Quantity and Carets will appear once you enter the Item Code.
Cannot exceed the Available Quantity and Carets when buying.
When buying according to Carets, must enter the price of a Carat.(Software will
multiply the
price according to the Carat amount).
Buying method can be selected as convenient and the commission Rate will be included
in the
Sub Total.
Data can be deleted from the table when you press the Delete button after selecting
the
row.
Save button will be visible after entering data to Payment field
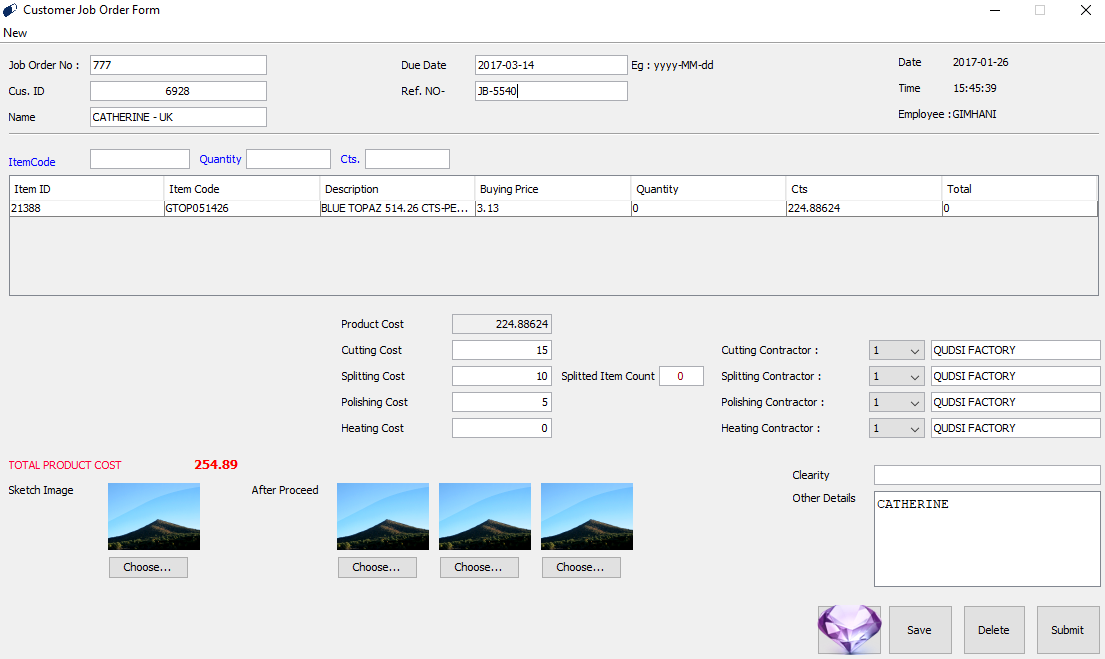
Job Order
Job Order Form will notify the Stock Status after deducing the Gems sent for the Contractors for Cutting, Splitting, Polishing and Heating purposes.
Price will be calculated quantity wise. Therefor it is compulsory to issue items
quantity
wise.
Product cost will be calculated automatically.
For a new item to be Cut, Split, Polished or Heated, it must be added as a new item.
Note - by clicking the button in the Job Order Form
depicting a
gem you can create a new item or see Items
Ref.No and the Due Date given by the Contractors can be added to the relevant fields
in the
Job Order Form.
It is possible to add the Sketched Image as well as the Images after the
proceedings, to the
Job Order Form.
After all the proceedings you can click the Submit button or the Job Order will be
depicted
in the Home Page as Un-submitted Job Orders.
Deleting and Updating in the Job Order Form can be done only by the Administrator
but
Savings of the Job Order Form can be done by the other operators.
Any other details about the Job Order can be added to the Other Details Text
Field.
It is compulsory to select the contractor before saving.
Transfer Note
This is the form used when transferring Items from one Store to another Store.
Can be transferred Carat wise or Quantity wise using the Transfer Note. Deleting’s can be done only by the Administrator but Savings in the Transfer Note can be done by the other Operators as well. By entering the Transfer Note No. you can get the details of the past Transfer Notes. Hard Copies of the Transfer Note can be obtained.
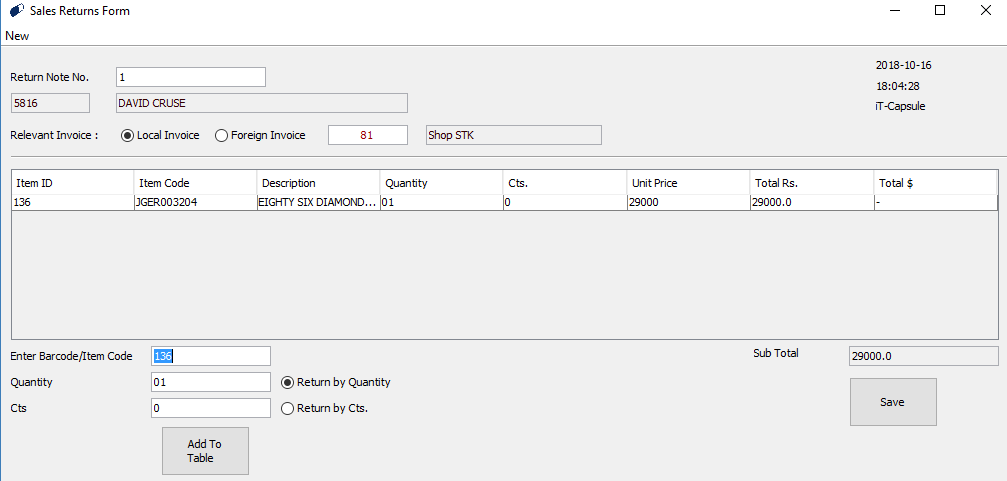
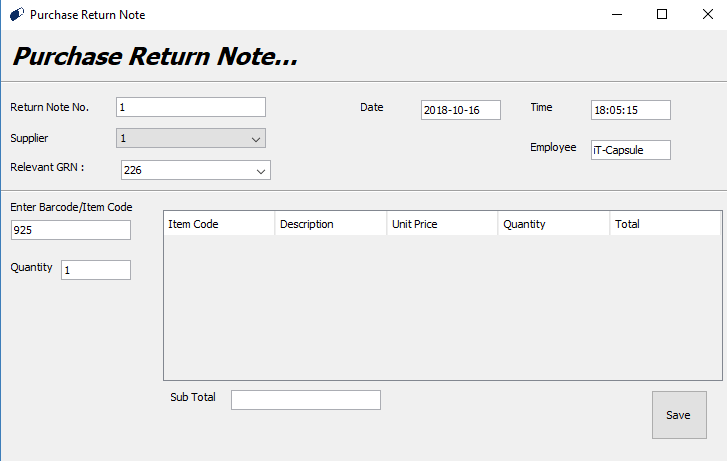
Sales Returns | Purchase Returns
Returns can be filled using these forms.
Sales Returns and Purchase Returns must be filled separately in the Sales Return
Note and
the Purchase Return Note respectively.
It is compulsory to type the Invoice number in Sales Returns Form (field circled in
Sales
Return Form) and to select the Supplier ID and relevant GRN number in Purchase
Return Note.
Purchase Order
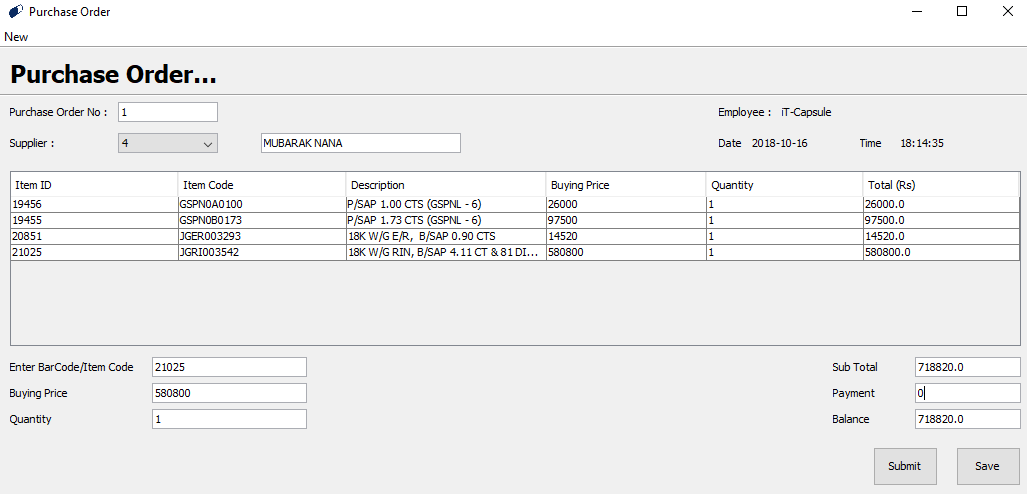
This is the record to show the ordered purchases from the Suppliers. Purchase Order does not affect the Inventory Control System.
Purchase order can be filled Quantity wise or according to the price.
Purchase Order Details will be visible in the Purchase Order form available in the
Home
Page. Once you receive the Items, click the Submit button.
It is compulsory to select the Supplier.
Payment field should be filled with the relevant amount or must type 0(zero) and
enter.
Before Submitting Purchase Order No. should be filled in the relevant field.
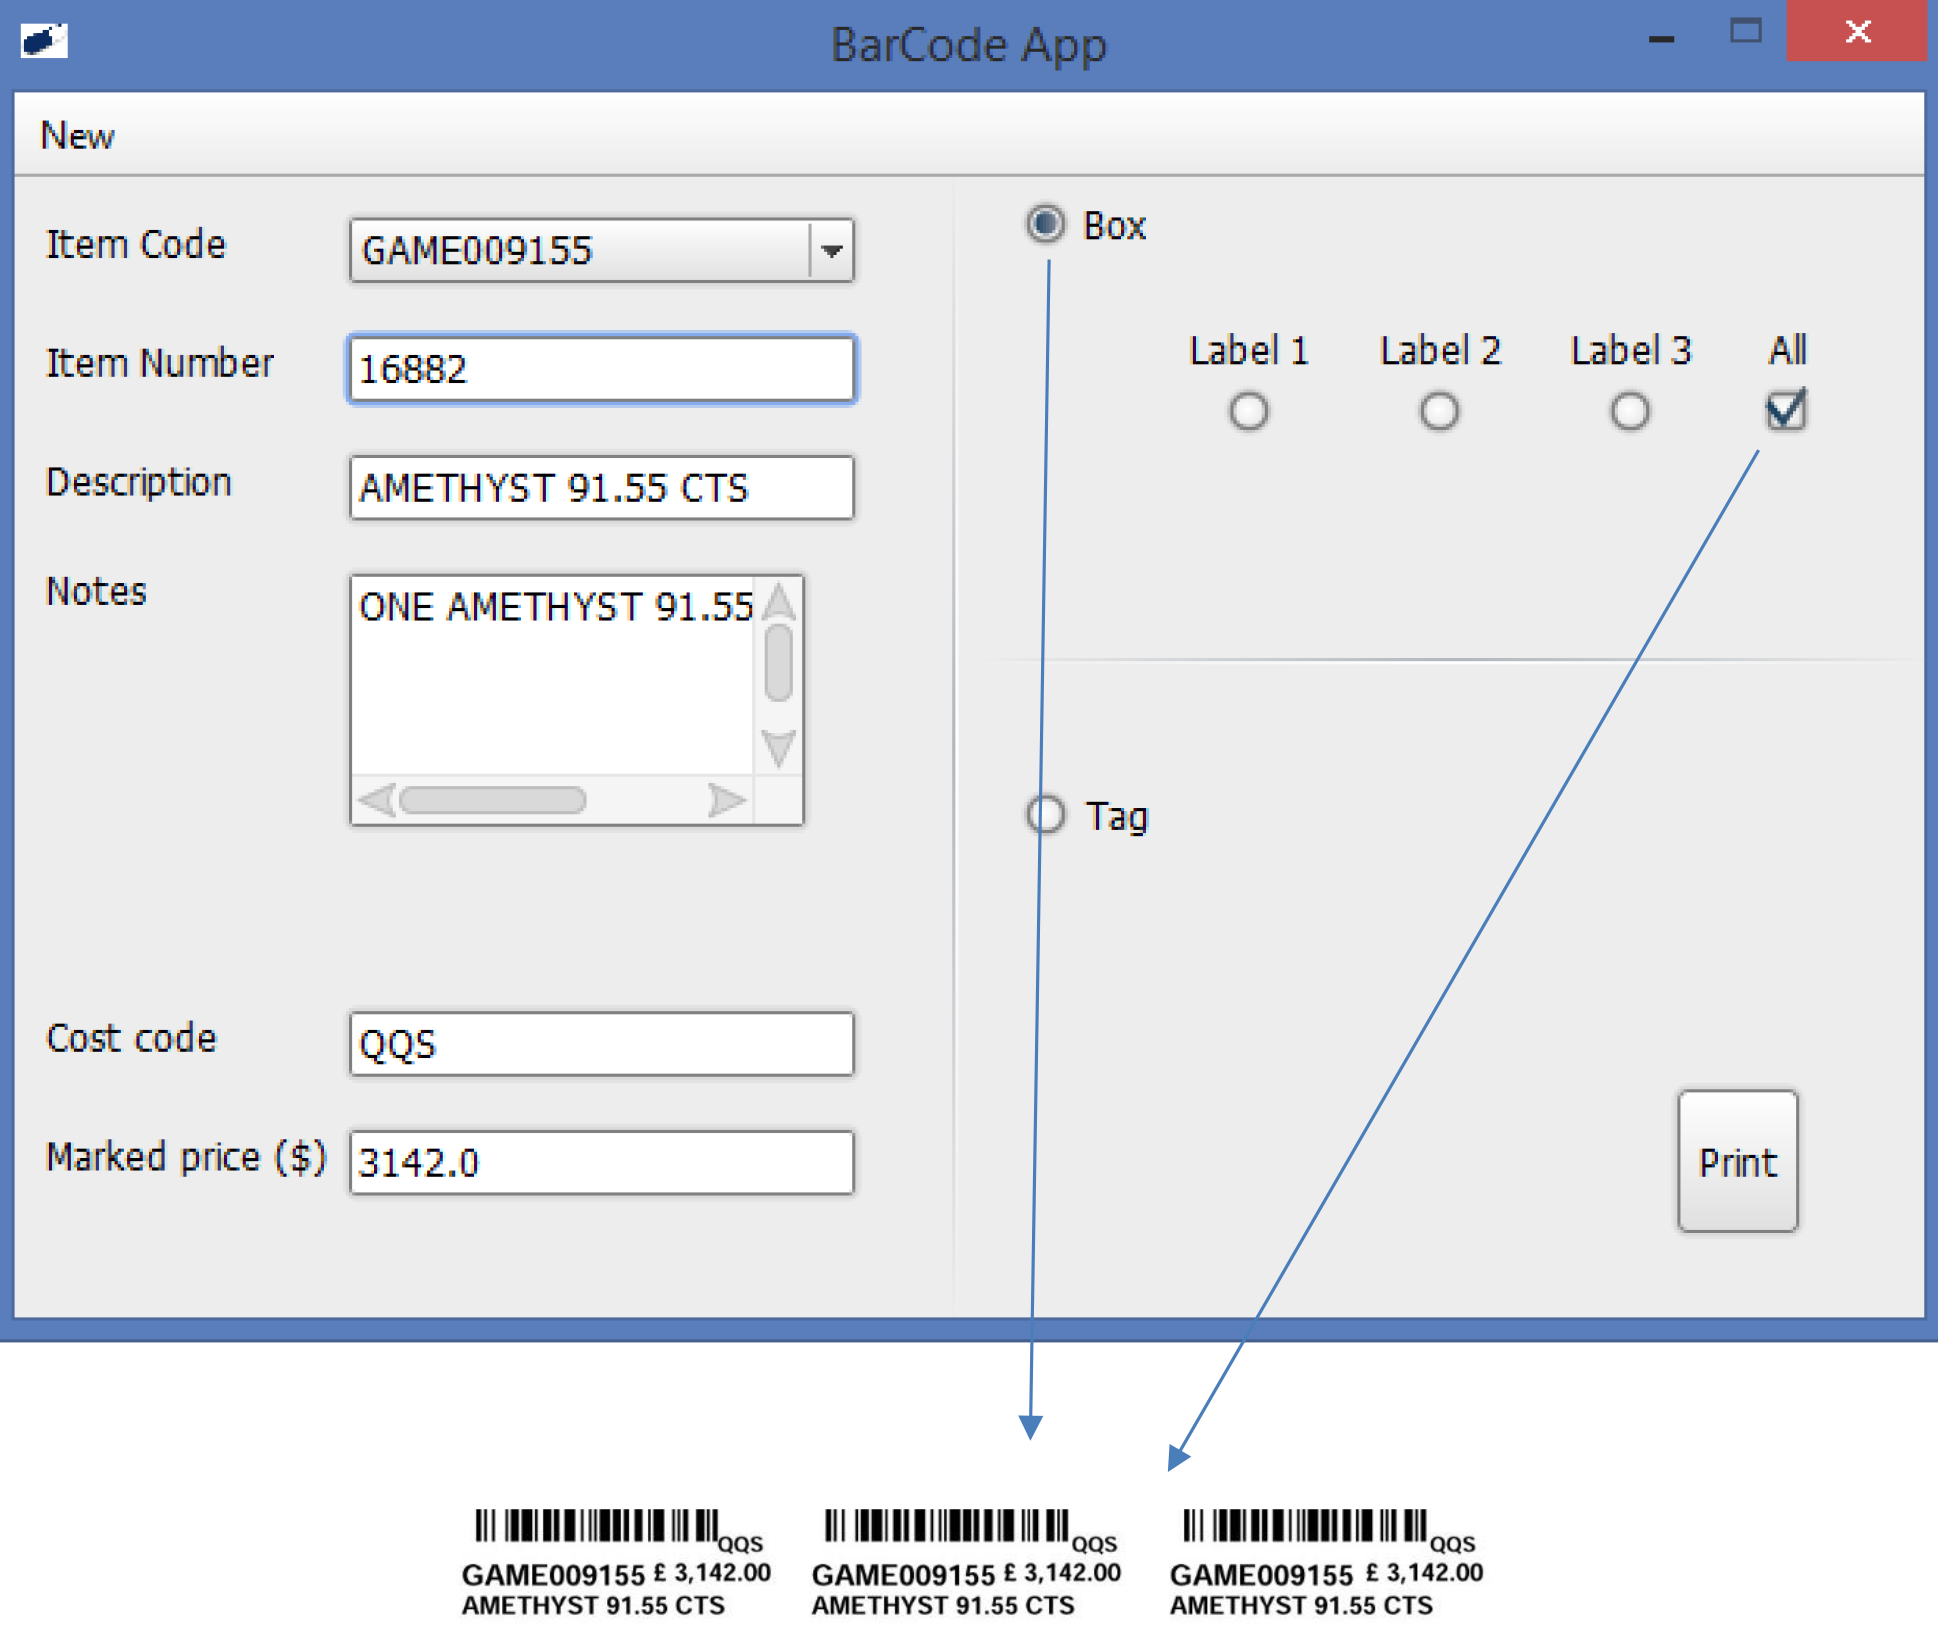
Barcode
Application used to print barcodes.
All the relevant details will appear on the relevant fields once you enter the Item
Code or
the Item Number.
When printing the barcode for a box, select the Box button and select the relevant
label
type.
Before printing the barcode, item should be added to the system. (see
Items)
Click the Tag button when printing barcodes for a Tag or select the Box button when
printing
the barcode for a Box.
TO PRINT A BARCODE- File -> Print Barcode or press Ctrl+p button
Certificate
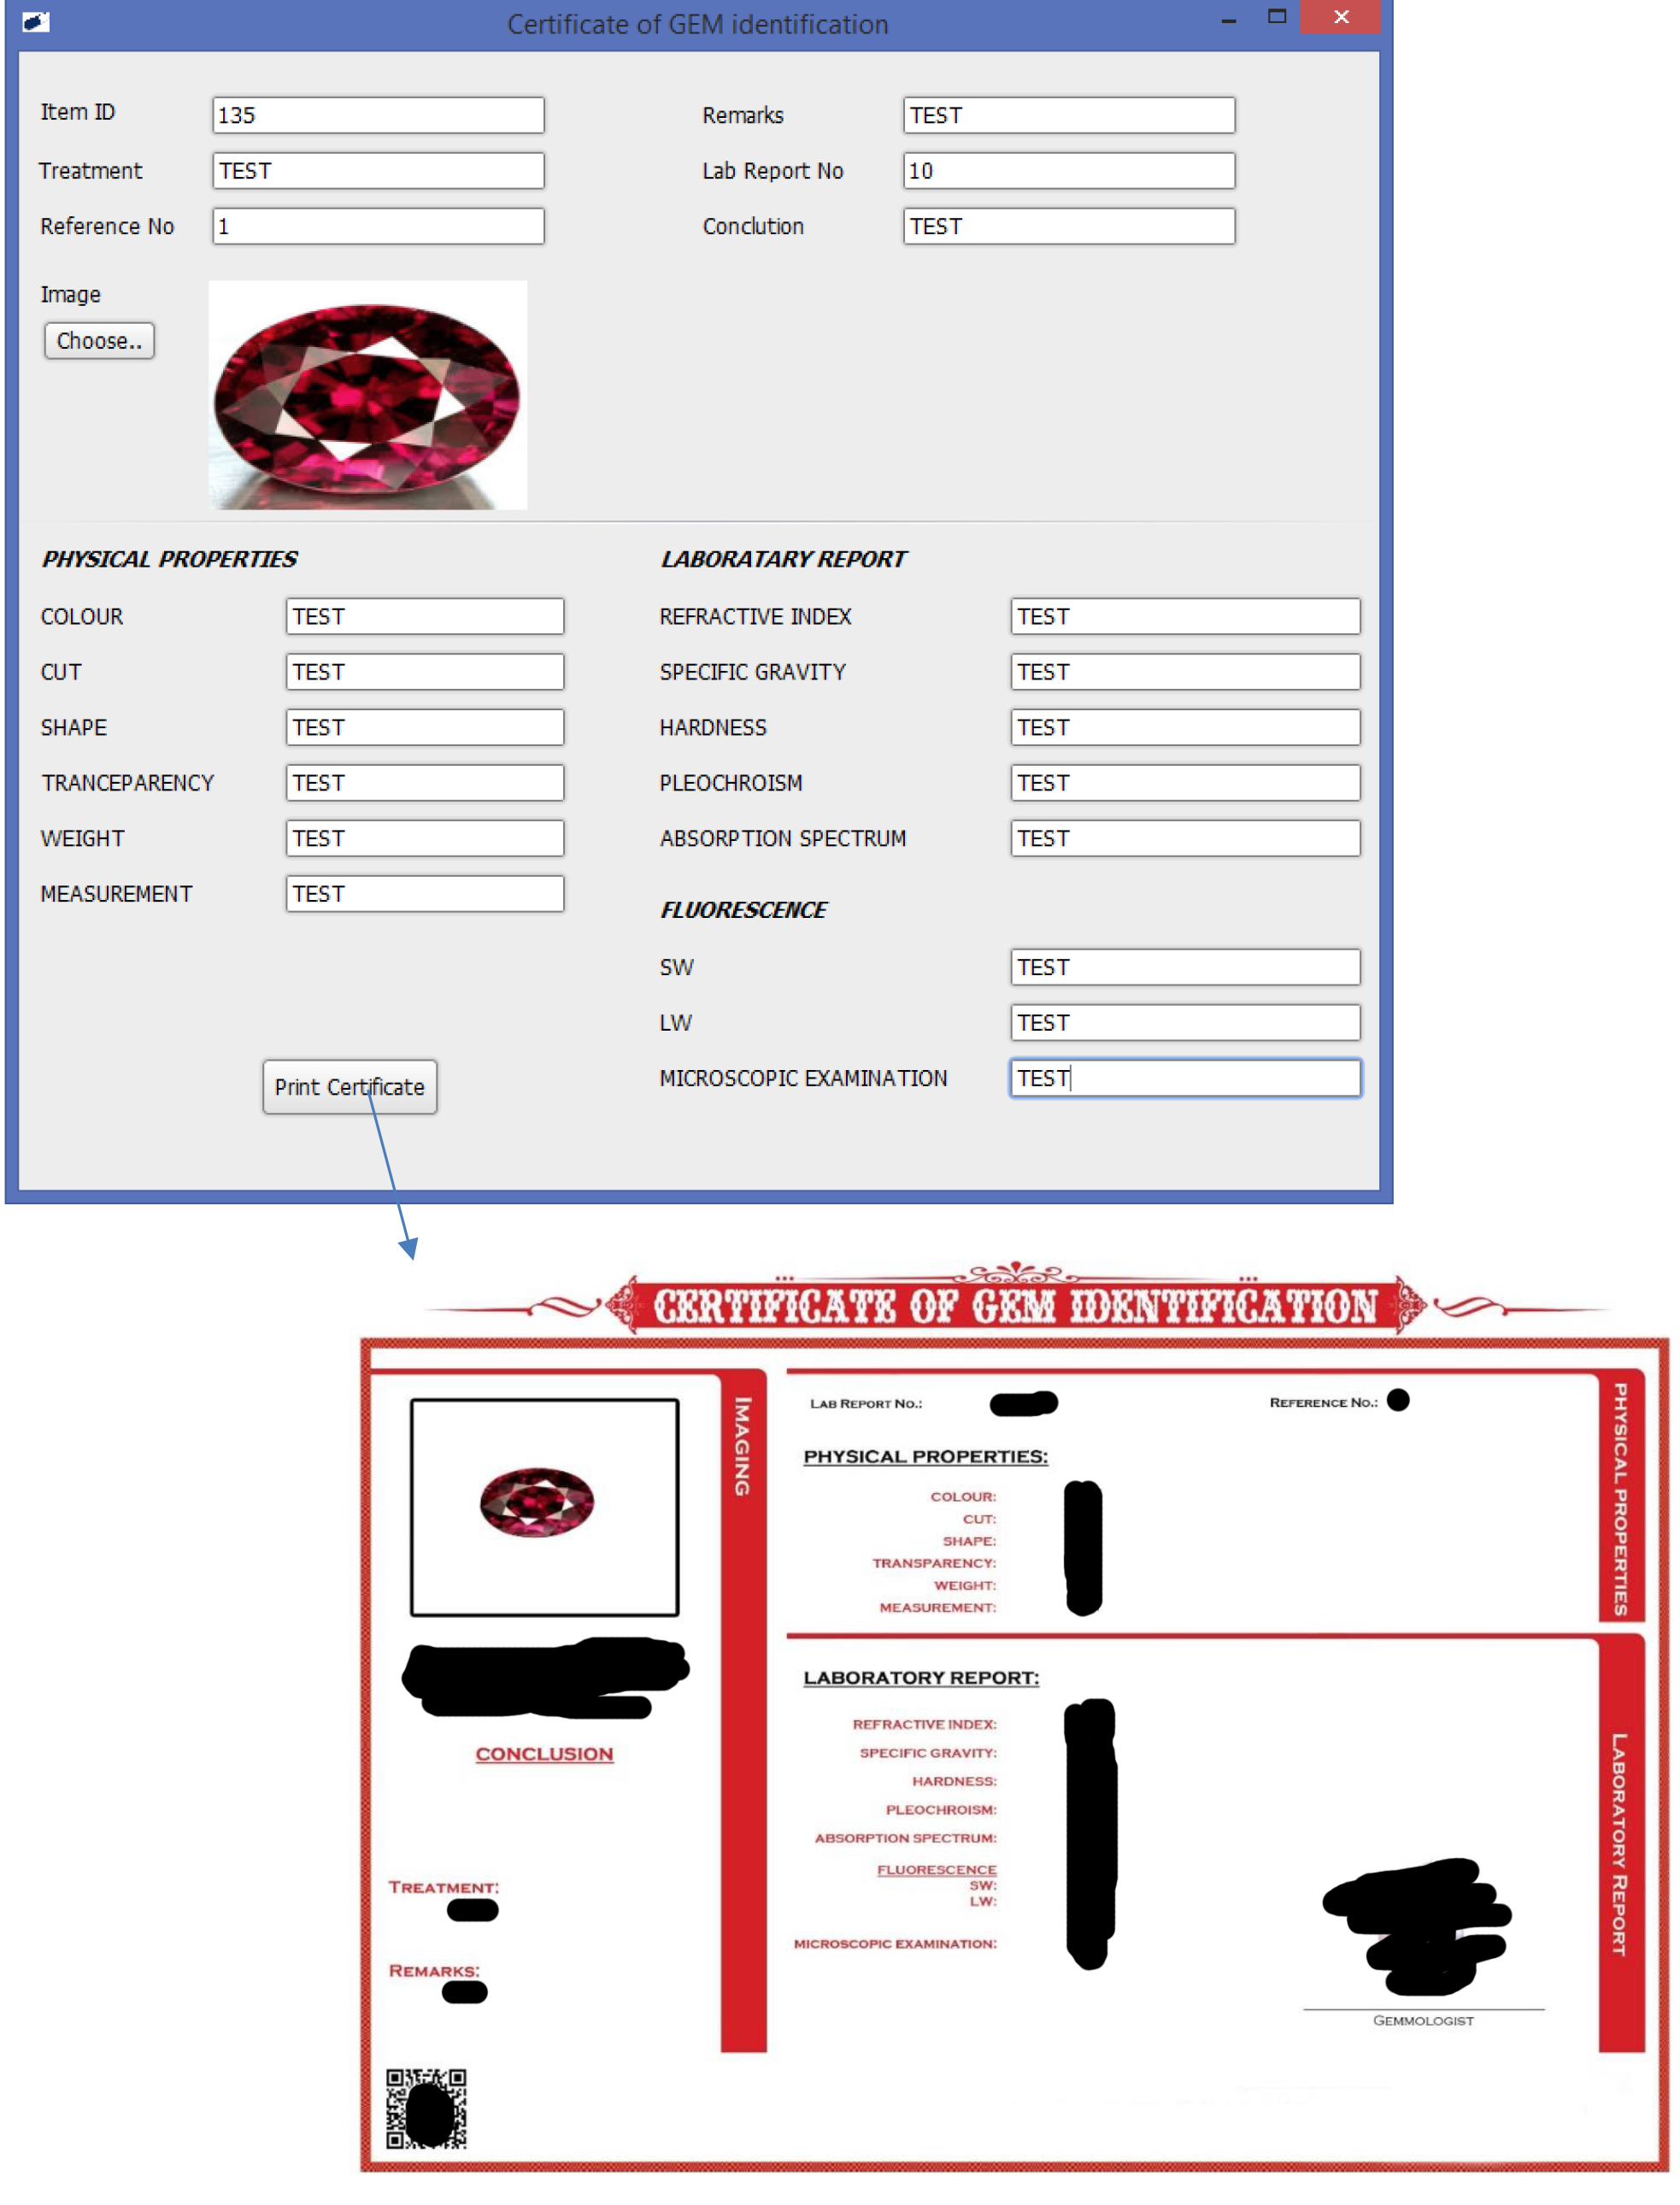
Certificate given for the customer’s satisfaction when selling Gems or Jewelleries.
Lab Report No. is the number of the Certificate. It will be appointed
automatically.
It is compulsory for the Reference No. to be an integer value. (Ex: 1, 2, 3…)
It is compulsory to choose the Image.
Enter the Lab Report Number in order to view an already issued certificate.
TO ISSUE A CERTIFICATE - File -> Print Certificate
Reporting
Local Sales Report
By entering the From: date and To: date, Sales Return Reports can be viewed within that duration. TO VIEW SALES RETURN REPORT - View -> Reports -> Sales Return Report
Foreign Sales Report
By entering the From: date and To: date, Foreign Sales Reports can be viewed within that duration. TO VIEW FOREIGN SALES REPORT - View -> Reports -> Foreign Sales
Item Summary Report
By clicking View button in front of View all Items, all the Items available in the stock with more than one Item will be shown. By clicking View button in front of View Item by Class, you can view items according to the relevant class. (category) TO VIEW ITEM SUMMARY REPORT - View -> Reports -> Item Summary Report
Sales by Employee
Select the Employee name to obtain the Sales summary relevant to that employee name. TO VIEW SALES BY EMPLOYEE REPORT - View -> Reports -> Sales by Employee
Item History Report
Depicts the history of an Item as, • Local Invoice - L/I xxx • Foreign Invoice - F/I xxx • Good Receive Note - GRN xxx • Job Order - J/Or xxx • Transfer Note - Trn xxx A hard copy of the Item History Report can be obtained.
Sales Returns
By entering the from: date and To: date, Sales Return Reports can be viewed within that duration. TO VIEW SALES RETURN REPORT - View -> Reports -> Sales Return Report